- Identify stakeholders
- Describe the categories of sensitive information to protect
- Set goals and strategy
Licensing and Subscriptions
See the Microsoft 365 guidance for security & compliance for details on the subscriptions that support DLP.
DLP is part of the larger Microsoft Purview offering
DLP is just one of the Microsoft Purview tools that you'll use to help protect your sensitive items wherever they live or travel. You should understand the other tools in the Microsoft Purview tool set, how they interrelate, and work better together. See, Microsoft Purview tools to learn more about the information protection process.
Protective actions of DLP policies
DLP policies are how you monitor the activities that users take on sensitive items at rest, sensitive items in transit, or sensitive items in use and then take protective actions. For example, when a user attempts a prohibited action, like copying a sensitive item to an unapproved location or sharing medical information in an email, DLP can:
- show a pop-up policy tip to the user that warns them that they might be trying to share a sensitive item inappropriately
- block the sharing and, via a policy tip, allow the user to override the block and capture the users' justification
- block the sharing without the override option
- for data at rest, sensitive items can be locked and moved to a secure quarantine location
- for Teams chat, the sensitive information won't be displayed
All DLP monitored activities are recorded to the Microsoft 365 Audit log by default and routed to Activity explorer.
DLP lifecycle
A DLP implementation typically follows these major phases.
- Plan for DLP
- Prepare for DLP
- Deploy your policies in production
Plan for DLP
DLP monitoring and protection are native to the applications that users use every day. This helps to protect your organization's sensitive items from risky activities, even if your users are unaccustomed to data loss prevention thinking and practices. If your organization and your users are new to data loss prevention practices, the adoption of DLP might require a change to your business processes, and there will be a culture shift for your users. But, with proper planning, testing and tuning, your DLP policies protect your sensitive items while minimizing any potential business process disruptions.
Technology planning for DLP
Keep in mind that DLP as a technology can monitor and protect your data at rest, data in use and data in motion across Microsoft 365 services, Windows 10, Windows 11, and macOS (three latest released versions) devices, on-premises file shares, and on-premises SharePoint. There are planning implications for the different locations, the type of data you want to monitor and protect, and the actions to be taken when a policy match occurs.
Business processes planning for DLP
DLP policies can block users from performing prohibited activities, like inappropriate sharing of sensitive information via email. As you plan your DLP policies, you must identify the business processes that touch your sensitive items. The business process owners can help you identify appropriate user behaviors that should be allowed and inappropriate user behaviors that should be protected against. You should plan your policies and deploy them in simulation mode, and evaluate their impact, before running them in more restrictive modes.
Organizational culture planning for DLP
A successful DLP implementation is as much dependent on getting your users trained and acclimated to data loss prevention practices as it is on well planned and tuned policies. Since your users are heavily involved, be sure to plan for training for them too. You can strategically use policy tips to raise awareness with your users before changing the policy status from simulation mode to more restrictive modes.
Prepare for DLP
You can apply DLP policies to data at rest, data in use, and data in motion in locations such as:
- Exchange Online email
- SharePoint sites
- OneDrive accounts
- Teams chat and channel messages
- Microsoft Defender for Cloud Apps (Instances)
- Windows 10, Windows 11, and macOS (three latest released versions) devices
- On-premises repositories
- Fabric and Power BI workspaces
Each one has different prerequisites. Sensitive items in some locations, like Exchange online, can be brought under the DLP umbrella by just configuring a policy that applies to them. Others, such as on-premises file repositories, require a deployment of Microsoft Purview Information Protection scanner. You'll need to prepare your environment, code draft policies, and test them thoroughly before activating any blocking actions.
Deploy your policies in production
Design your policies
Start by defining your control objectives, and how they apply across each respective workload. Draft a policy that embodies your objectives. Feel free to start with one workload at a time, or across all workloads - there's no impact yet. For more information, see Create and deploy data loss prevention policies.
Implement policy in simulation mode
Evaluate the impact of the controls by implementing them with a DLP policy in simulation mode. Actions defined in a policy aren't applied while the policy is in simulation mode. It's ok to apply the policy to all workloads in simulation mode, so that you can get the full breadth of results, but you can start with one workload if you need to. For more information, see Policy Deployment.
Monitor outcomes and fine-tune the policy
While in simulation mode, monitor the outcomes of the policy and fine-tune it so that it meets your control objectives while ensuring you aren't adversely or inadvertently impacting valid user workflows and productivity. Here are some examples of things to fine-tune:
- adjusting the locations and people/places that are in or out of scope
- tune the conditions that are used to determine if an item and what is being done with it matches the policy
- the sensitive information definition/s
- add new controls
- add new people
- add new restricted apps
- add new restricted sites
Stop processing more rules doesn't work in simulation mode, even when it's turned on.
Enable the control and tune your policies
Once the policy meets all your objectives, turn it on. Continue to monitor the outcomes of the policy application and tune as needed.
In general, policies take effect about an hour after being turned on.
DLP policy configuration overview
You have flexibility in how you create and configure your DLP policies. You can start from a predefined template and create a policy in just a few clicks or you can design your own from the ground up. No matter which you choose, all DLP policies require the same information from you.
- Choose what you want to monitor - DLP comes with many predefined policy templates to help you get started or you can create a custom policy.
- A predefined policy template, such as Financial data, Medical and health data, Privacy data all for various countries and regions.
- A custom policy that uses the available sensitive information types (SIT), retention labels, and sensitivity labels.
- Choose administrative scoping - DLP supports assigning Administrative Units to policies. Administrators who are assigned to an administrative unit can only create and manage policies for the users, groups, distribution groups, and accounts that they're assigned to. So, policies can be applied to all users and groups by an unrestricted administrator, or they can be scoped to administrative units. See, Policy Scoping for more DLP specific details. See, Administrative units for the details on administrative units across Microsoft Purview Information Protection.
- Choose where you want to monitor - You pick one or more locations that you want DLP to monitor for sensitive information. You can monitor:
| location | include/exclude by |
|---|---|
| Exchange email | distribution groups |
| SharePoint sites | sites |
| OneDrive accounts | accounts or distribution groups |
| Teams chat and channel messages | account or distribution group |
| Windows 10, Windows 11, and macOS (three latest released versions) devices | user or group |
| Microsoft Cloud App Security | instance |
| On-premises repositories | repository file path |
| Fabric and Power BI | workspaces |
- item contains a specified types of sensitive information that is being used in a certain context. For example, 95 social security numbers being emailed to recipient outside your org.
- item has a specified sensitivity label
- item with sensitive information is shared either internally or externally
- SharePoint/Exchange/OneDrive: Block people who are outside your organization from accessing the content. Show the user a tip and send them an email notification that they're taking an action that is prohibited by the DLP policy.
- Teams Chat and Channel: Block sensitive information from being shared in the chat or channel.
- Windows 10, Windows 11, and macOS (three latest released versions) Devices: Audit or restrict copying a sensitive item to a removable USB device.
- Office Apps: Show a popup notifying the user that they're engaging in a risky behavior and block or block but allow override.
- On-premises file shares: move the file from where it's stored to a quarantine folder.
The conditions and the actions to take are defined in an object called a rule.
Create and deploy a DLP policy
All DLP policies are created and maintained in the Microsoft Purview compliance portal. See, Create and Deploy data loss prevention policies for more information.
After you create a DLP policy in the compliance portal, it's stored in a central policy store, and then synced to the various content sources, including:
- Exchange, and from there to Outlook on the web and Outlook
- OneDrive
- SharePoint sites
- Office desktop programs (Excel, PowerPoint, and Word)
- Microsoft Teams channels and chat messages
After the policy is synced to the right locations, it starts to evaluate content and enforce actions.
Viewing policy application results
DLP reports a vast amount of information to Microsoft Purview from monitoring to policy matches and actions, to user activities. You'll need to consume and act on that information to tune your policies and triage actions taken on sensitive items. The telemetry goes into the Microsoft 365 audit Logs first, is processed, and makes its way to different reporting tools. Each reporting tool has a different purpose.
High volume of sensitive info shared or save externally
Microsoft 365 provides you with visibility into risky user activities outside of DLP policies. The High volume of sensitive info shared or saved externally card on the DLP homepage shows a count of sensitive items that users have:
- uploaded to the suspicious domains
- accessed with a suspicious application
- copied to a removable drive
Microsoft 365 scans the audit logs for risky activities and runs them through a correlation engine to find activities that are occurring at a high volume. No DLP policies are required.
To get more details on the items that users are copying or moving outside of your organization (called egress activities, or exfiltration), select the Learn more link on the card to open a details pane. You can investigate incidents for Microsoft Purview Data Loss Prevention (DLP) from the Microsoft Defender portal Incidents & alerts > Incidents. See Investigate data loss incidents with Microsoft Defender XDR and Investigate alerts in Microsoft Defender XDR.
DLP Alerts
DLP generates an alert when a user performs an action that meets the criteria of a DLP policy, and you have Incident reports configured to generate alerts. DLP posts the alert for investigation in the DLP Alerts dashboard. Use the DLP Alerts dashboard to view alerts, triage them, set investigation status, and track resolution. Alerts are also routed to Microsoft Defender portal where you can do all the alert dashboard tasks plus more.
DLP alerts are available in the Microsoft Defender portal for six months. They are only available in the Microsoft Purview DLP alerts dashboard for 30 days.
If you are an administrative unit restricted admin, you'll only see the DLP alerts for your administrative unit.
Here's an example of alerts generated by policy matches and activities from Windows 10 devices.

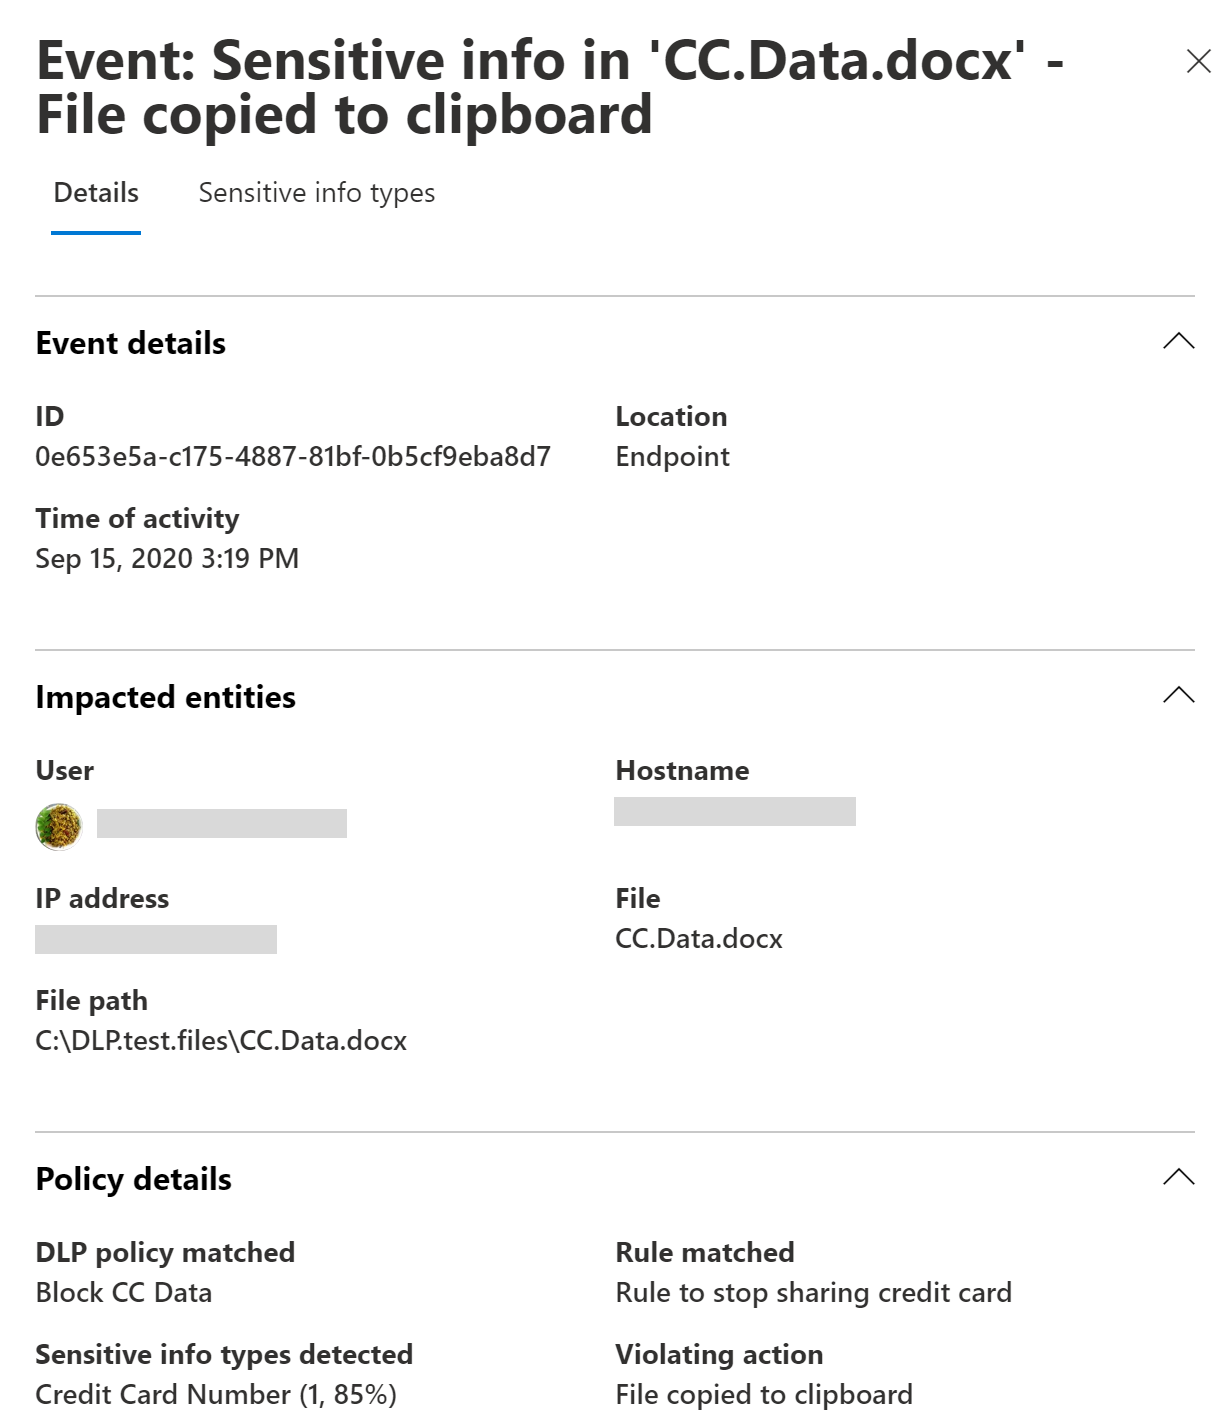
You can also view details of the associated event with rich metadata in the same dashboard.
Alerts are generated differently for emails than they are for SharePoint or OneDrive items. In SharePoint and OneDrive, DLP scans existing items as well as new ones and generates an alert whenever a match is found. In Exchange, new email messages are scanned and an alert is generated if there's a policy match. DLP does not scan or match previously existing email items that are stored in a mailbox or archive.
For more information on Alerts, see:
- Alerts in DLP policies: Describes alerts in the context of a DLP policy.
- Get started with data loss prevention alerts: Covers the necessary liscensing, permissions, and prerequisites for DLP alerts and alert reference details.
- Create and deploy data loss prevention policies: Includes guidance on alert configuration in the context of creating a DLP policy.
- Learn about investigating data loss prevention alerts: Covers the various methods for investigating of DLP alerts.
- Investigate data loss incidents with Microsoft Defender XDR: How to investigate DLP alerts in Microsoft Defender portal.
DLP Activity Explorer and reports
The Activity explorer tab on the DLP page has multiple filters you can use to view DLP events. Use this tool to review activity related to content that contains sensitive info or has labels applied, such as what labels were changed, files were modified, and matched a rule.
You can view the last 30 days of DLP information in Activity Explorer using these preconfigured filters:
- Endpoint DLP activities
- Files containing sensitive info types
- Egress activities
- DLP policies that detected activities
- DLP policy rules that detected activities
| To see this information | Select this activity |
|---|---|
| User overrides | DLP rule undo |
| Items that match a DLP rule | DLP rule matched |
You can also access DLP report using via these cmdlets in the Security & Compliance PowerShell.
Use these cmdlets:
- Get-DlpDetailReport
- Get-DlpDetectionsReport
- Get-DlpSiDetectionsReport
However, DLP reports need to pull data from across Microsoft 365, including Exchange. For this reason, the following cmdlets for DLP reports are available in Exchange PowerShell. To use the cmdlets for these DLP reports, take the following steps:
Use these cmdlets:
- Get-DlpDetailReport
- Get-MailDetailDlpPolicyReport
Contextual summary
You can see the text that surrounds the matched content, like a credit card number in a DLPRuleMatch event in Activity explorer.
DLPRuleMatch events are paired with user egress activities such as "CopyToClipboard" or "CloudEgress". They should be right next to (or at least very close to) each other in Activity explorer. You'll want to look at both because the user activity contains details about the matched policy and the DLPRuleMatch event contains the details about the text that surrounds the matched content.
For endpoint, be sure that you have applied KB5016688 for Windows 10 devices and KB5016691 for Windows 11 devices or above.
To learn more about Microsoft Purview DLP, see:
- Learn about Endpoint data loss prevention
- Learn about the default data loss prevention policy in Microsoft Teams (preview)
- Learn about data loss prevention on-premises scanner
- Learn about the Microsoft Compliance Extension
- Get started with the data loss prevention Alerts dashboard
To learn how to use data loss prevention to comply with data privacy regulations, see Deploy information protection for data privacy regulations with Microsoft Purview (aka.ms/m365dataprivacy).